|
利用LVS+Keepalived 实现高性能高可用负载均衡
背景:
随着你的网站业务量的增长你网站的服务器压力越来越大?需要负载均衡方案!商业的硬件如F5又太贵,你们又是创业型互联公司如何有效节约成本,节省不必要的浪费?同时实现商业硬件一样的高性能高可用的功能?有什么好的负载均衡可伸张可扩展的方案吗?答案是肯定的!有!我们利用LVS+Keepalived基于完整开源软件的架构可以为你提供一个负载均衡及高可用的服务器。
一. LVS+Keepalived 介绍
1. LVS LVS是 Linux Virtual Server的简写,意即 Linux虚拟服务器,是一个虚拟的服务器集群系统。本项目在1998年5月由章文嵩博士成立,是中国国内最早出现的 自由软件项目之一。目前有三种IP负载均衡技术(VS/NAT、VS/TUN和VS/DR); 八种调度算法(rr,wrr,lc,wlc,lblc,lblcr,dh,sh)。
2. Keepalvied Keepalived在这里主要用作RealServer的健康状态检查以及LoadBalance主机和BackUP主机之间failover的实现
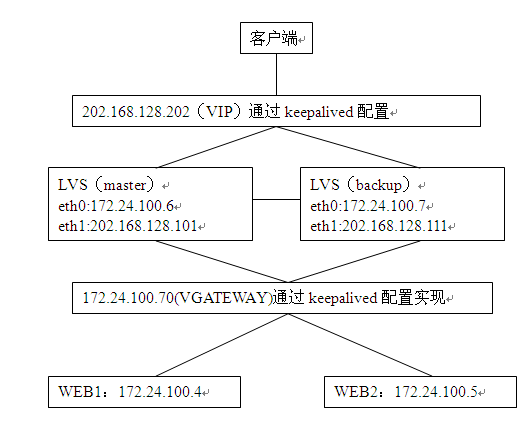
二. 网站负载均衡拓朴图

三、配置IP
LVS(master)增加一片网卡:
eth0:172.24.100.6
eth1:202.168.128.101
LVS(backup)增加一片网卡:
eh0:172.24.100.7
eh1:202.168.128.111
对外虚拟IP:202.168.128.202
对内虚拟IP:172.24.100.70
四. 安装LVS和Keepalvied软件包
#lsmod | rep ip_vs
#uname -r
显示2.6.18-53.el5PAE
#ln -s/usr/src/kernels/2.6.18-53.el5PAE-i686/ /usr/src/linux
#tar zxvfipvsadm-1.24.tar.gz #cd ipvsadm-1.24 #make all && make install(安装相关包:gcc*)
#find / -name ipvsadm # 查看ipvsadm的位置
#tar zxvf keepalived-1.1.15.tar.gz
#cd keepalived-1.1.15
#./configure (提示安装openssl*)
# make && make install
#find / -name keepalived # 查看keepalived位置
#cp /usr/local/etc/rc.d/init.d/keepalived/etc/rc.d/init.d/ #cp /usr/local/etc/sysconfig/keepalived/etc/sysconfig/ #mkdir /etc/keepalived
#cp/usr/local/etc/keepalived/keepalived.conf /etc/keepalived/ #cp /usr/local/sbin/keepalived /usr/sbin/
#chkconfig —addkeepalived #chkconfig keepalived on
五. 配置LVS
在LVS机上配置(两台都要配置)
#vim /usr/local/sbin/lvsdr.sh
#!/bin/bash
VIP=202.168.128.202
RIP1=172.24.100.4
RIP2=172.24.100.5
/etc/rc.d/init.d/functions
case "$1" in
start)
echo "start LVS of DirectorServer" /sbin/ipvsadm -C /sbin/ipvsadm -A -t $VIP:80 -s rr /sbin/ipvsadm -a -t $VIP:80 -r $RIP1:80 -m -w 1 /sbin/ipvsadm -a -t $VIP:80 -r $RIP2:80 -m -w 1 /sbin/ipvsadm ;;
stop)
echo "Close LVS Directorserver"
/sbin/ifconfig eth0:1 down
/sbin/ipvsadm -C
;;
*)
echo "Usage0{start|stop}"
exit 1
esac
六. 利用Keepalvied实现负载均衡和和高可用性
1.主LVS上:172.24.100.6
global_defs {
router_id LVS_DEVEL }
vrrp_sync_group lvs_1 {
group { VI_1
VI_GATEWAY
}
}
vrrp_instance VI_1 {
state MASTER interface eth1 virtual_router_id 51 priority 100 advert_int 1 authentication { auth_type PASS auth_pass 1111 } virtual_ipaddress { 202.168.128.202 #要指定子网掩码 } }
vrrp_instance VI_GATEWAY {
state MASTER interface eth0 virtual_router_id 52 priority 100 advert_int 1 authentication { auth_type PASS auth_pass 1111 } virtual_ipaddress { 172.24.100.70 }
}
virtual_server 202.168.128.202 80 {
delay_loop 6 lb_algo rr lb_kind NAT nat_mask 255.255.0.0 persistence_timeout 50 protocol TCP real_server 172.24.100.4 80 { weight 1
TCP_CHECK {
connect_timeout 3
nb_get_retry 3
delay_before_retry 3
}
} real_server 172.24.100.5 80 { weight 1
TCP_CHECK {
connect_timeout 3
nb_get_retry 3
delay_before_retry 3
}
} }
2.从LVS:172.24.100.7
global_defs {
router_id LVS_DEVEL
}
vrrp_sync_grouplvs_1 {
group {
VI_1
VI_GATEWAY
}
}
vrrp_instanceVI_1 {
state BACKUP
interface eth1
virtual_router_id 51
priority 90
advert_int 1
authentication {
auth_type PASS
auth_pass 1111
}
virtual_ipaddress {
202.168.128.202
}
}
vrrp_instanceVI_GATEWAY {
state BACKUP
interface eth0
virtual_router_id 52
priority 90
advert_int 1
authentication {
auth_type PASS
auth_pass 1111
}
virtual_ipaddress {
172.24.100.70
}
}
virtual_server202.168.128.202 80 {
delay_loop 6
lb_algo rr
lb_kind NAT
nat_mask 255.255.0.0
persistence_timeout 50
protocol TCP
real_server 172.24.100.4 80 {
weight 1
TCP_CHECK {
connect_timeout 3
nb_get_retry 3
delay_before_retry 3
}
}
real_server 172.24.100.5 80 {
weight 1
TCP_CHECK {
connect_timeout 3
nb_get_retry 3
delay_before_retry 3
}
}
}
3.开启IP转发
net.ipv4.ip_forward=1
七、配置WEB端(172.24.100.4和172.24.100.5)
1. 配置IP转发功能 #vim/etc/sysctl.conf
net.ipv4.ip_forward=1
net.ipv4.conf.lo.arp_ignore= 1
net.ipv4.conf.lo.arp_announce = 2
net.ipv4.conf.all.arp_ignore = 1
net.ipv4.conf.all.arp_announce = 2 2. 配置网关
#vim/etc/sysconfig/network-scripts/ifcfg-eth0添加
GATEWAY=172.24.100.70
#servicenetwork restart
八、启动服务
# /usr/local/sbin/lvsdr.shstart (把这条语句写到/etc/rc.local中,开机启动)
#/etc/init.d/keepalivedstart 启动keepalived 服务,keepalived就能利用keepalived.conf 配置文件,实现负载均衡和高可用.
九、测试
1. # ip addr show eth0: <BROADCAST,MULTICAST,UP,LOWER_UP> mtu 1500 qdisc pfifo_fast qlen 1000 link/ether 00:0c:29:9d:db:59 brd ff:ff:ff:ff:ff:ff
inet 172.24.100.6/24 brd 172.24.0.255 scopeglobal eth0
inet 172.24.100.70/32 scope global eth0
inet6 fe80::20c:29ff:fe9d:db59/64 scope link
valid_lft forever preferred_lft forever
eth1: <BROADCAST,MULTICAST,UP,LOWER_UP> mtu 1500 qdisc pfifo_fast qlen 1000
link/ether 00:0c:29:9d:db:63 brdff:ff:ff:ff:ff:ff
inet 202.168.128.101/24 brd202.168.128.255 scope global eth1
inet 202.168.128.202/32 scope global eth1
inet6 fe80::20c:29ff:fe9d:db63/64 scope link
valid_lft forever preferred_lft forever
………
最后把主机宕机,到从机上使用ipaddr show 查看,同上则OK。同时还需要用浏览器来测试。
2. 查看lvs服务是否正常
#watch ipvsadm –ln
IP VirtualServer version 1.2.1 (size=4096)
ProtLocalAddress:Port Scheduler Flags
-> RemoteAddress:Port Forward Weight ActiveConn InActConn
TCP 202.168.128.202:80 wrr persistent 60
-> 172.24.100.5:80 Route 3 0 0
-> 172.24.100.4:80 Route 3 0 0
#tail –f /var/log/message 监听日志,查看状态。
3.将一台web 服务器关闭,然后在LVS 上用ipvsadm 命令查看,关闭的服务器应该从
lvs集群中剔除了,再将关闭的服务器启动起来,用ipvsadm查看,又回来了。
|  /2
/2 