问题导读
1、你如何理解从url拼装到nova后端请求数据?
2、获取当前租户所有可用hosts的API是如何实现的?
3、如何调用api添加到底层数据库做持久化?

第一部分:页面层即horizon与novaclient
1、首先上图此功能:
图1-1

右边的admin与service为租户信息。点击modify isolation 对该租户计算资源进行隔离配置
图1-2
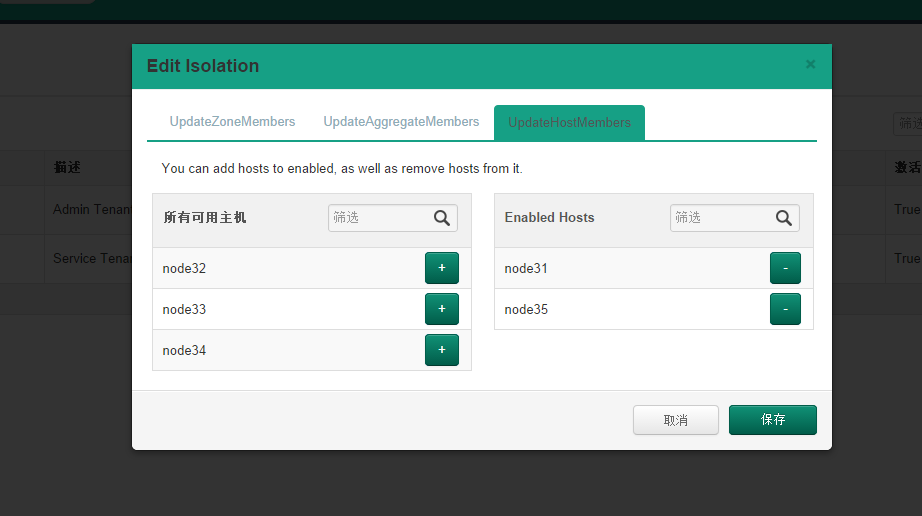
模态框有三个tab标签页,分别为控制host、aggregate、zone。以host为例,右边为该租户生成虚拟机能够选择的计算节点。左边则为被隔离节点。
2、讲解图1-1:即主页,index。
图2-1:isolations模块文件结构
申明:每次截图pycharm时候都会截大图,目的是让大家能够通过编辑器最上面标签看到文件的路径,关于这点后续博文中则不再提及。
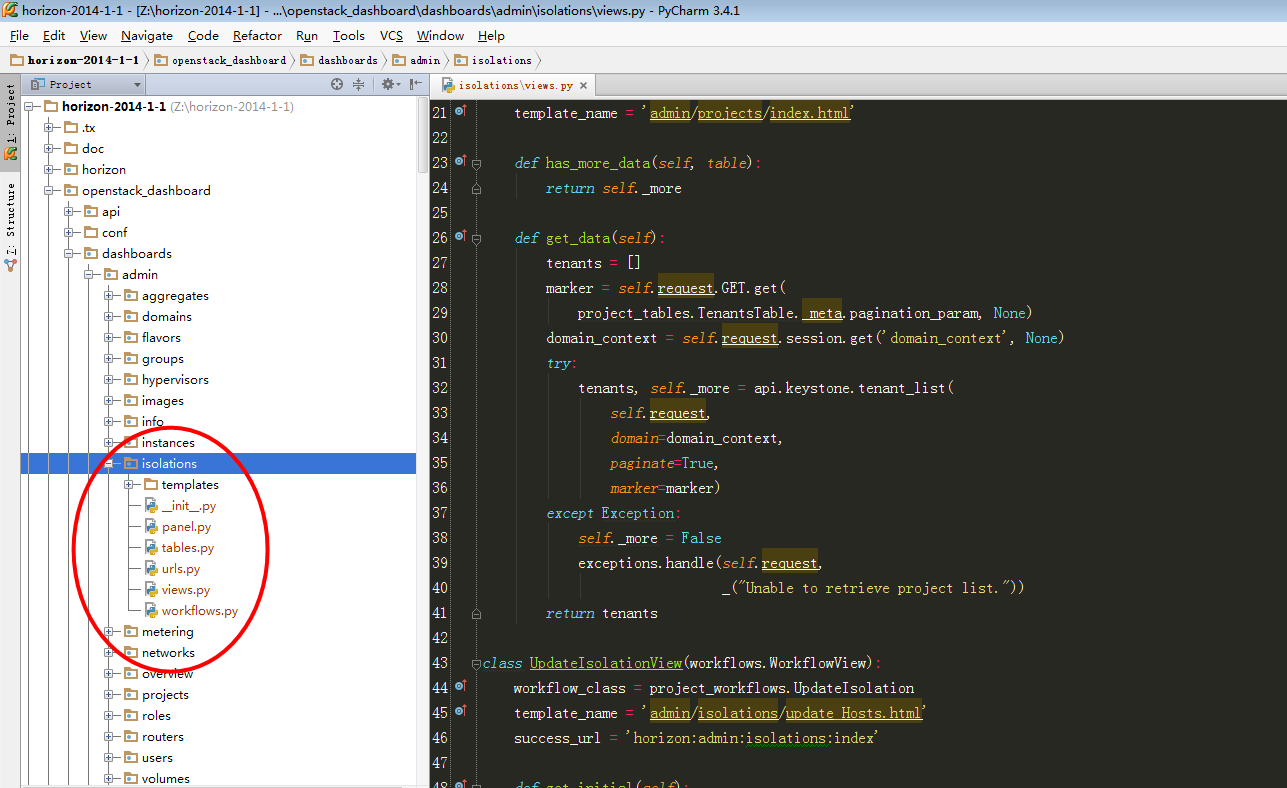
图2-2:TenantsTable定义了图1-1表格,以及按钮
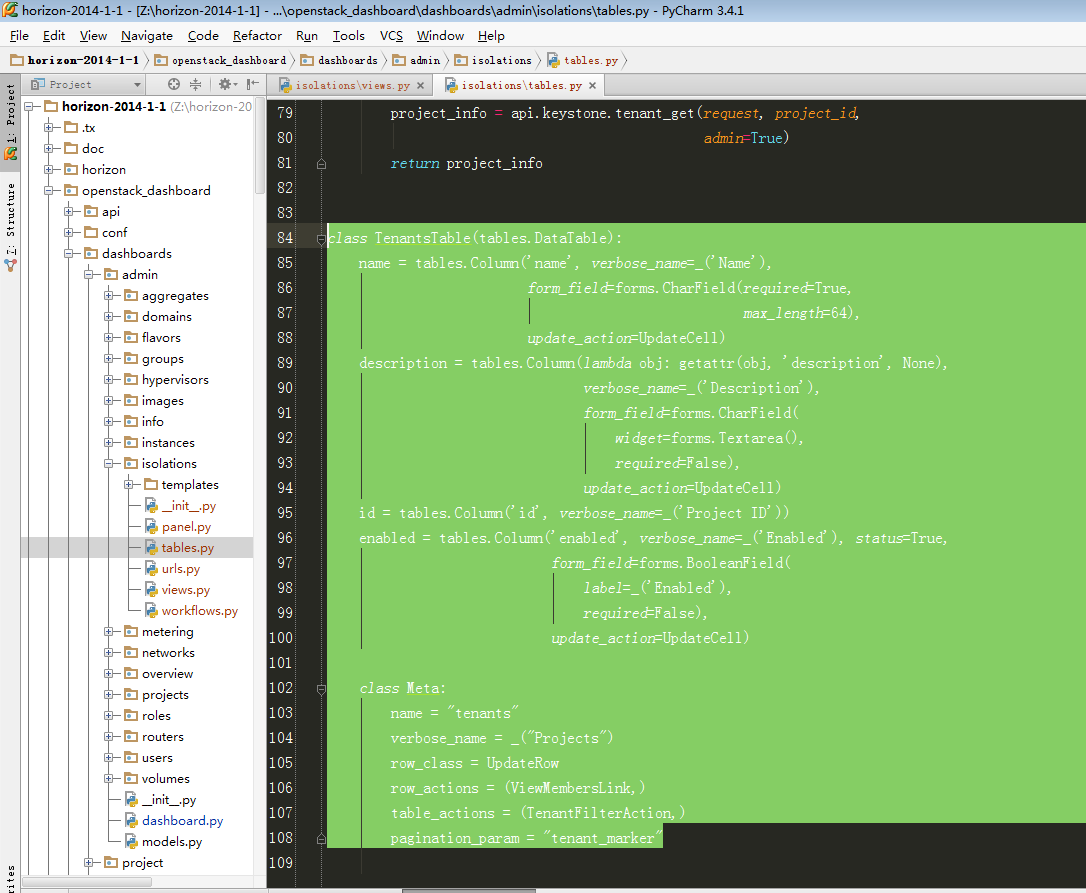
其中row_actions = (ViewMembersLink,)表示为下图按钮:

3、跟进到ViewMembersLink:
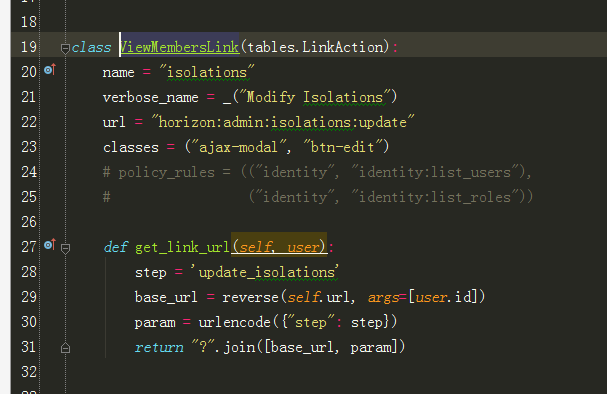
4、根据url = "horizon:admin:isolations:update"跟进到urls.py文件:

5、跟进到UpdateIsolationView:
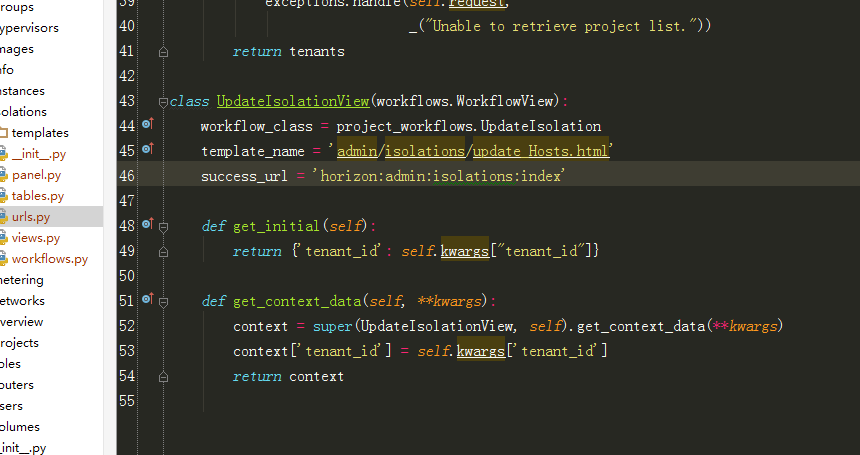
其中self.kwargs["tenant_id"]是获取url中的tenant_id。
6、跟进到UpdateIsolation:
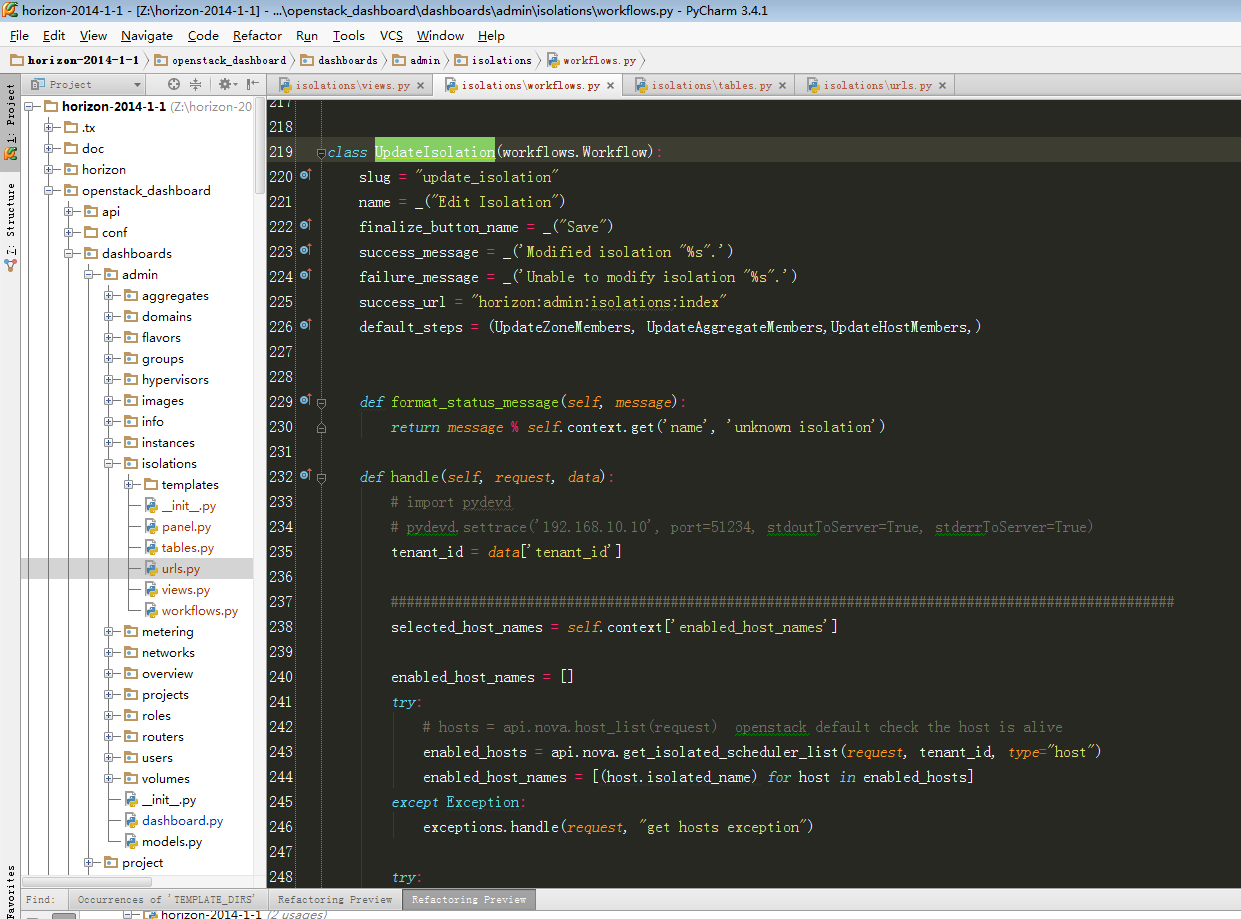
其中handle则是点击页面保存之后执行。此处代码将在后面步骤9中进行讲解。
- default_steps = (UpdateZoneMembers, UpdateAggregateMembers,UpdateHostMembers,)
上述定义的三个步骤即为图1-2中的三个tab标签。接下来以UpdateHostMembers为例进行讲解。
7、跟进到UpdateHostMembers
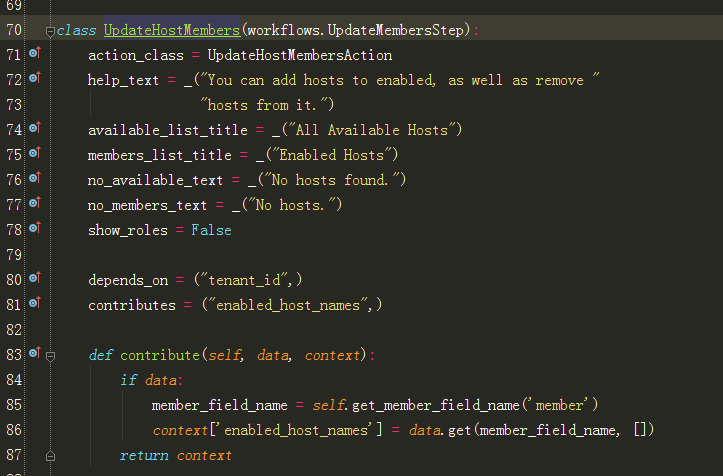
8、跟进到UpdateHostMembersAction:
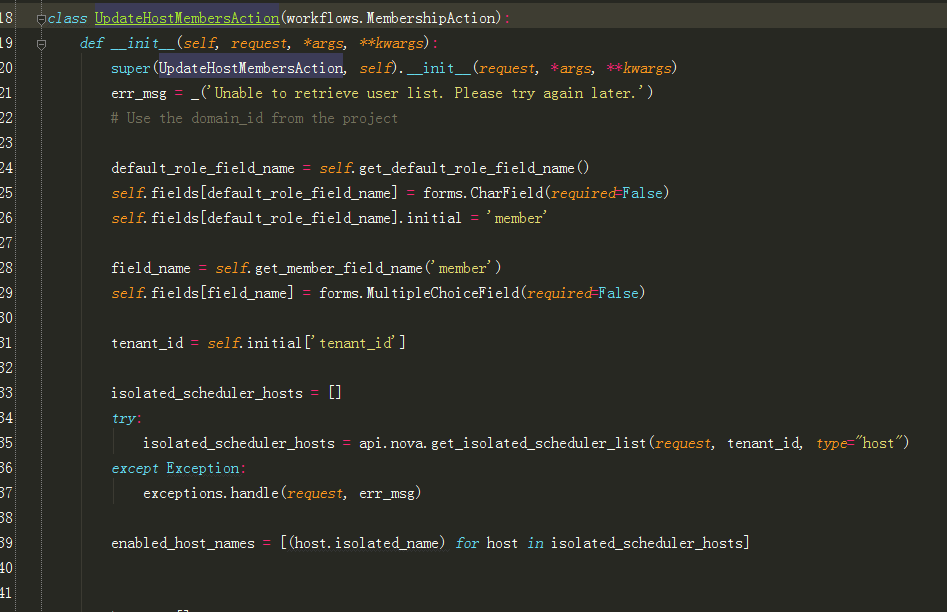
此处主要是将动态多选插件数据初始化如图1-2,下面附上代码:
- class UpdateHostMembersAction(workflows.MembershipAction):
- def __init__(self, request, *args, **kwargs):
- super(UpdateHostMembersAction, self).__init__(request, *args, **kwargs)
- err_msg = _('Unable to retrieve user list. Please try again later.') #定义错误提示信息
- #下面5行代码可以直接使用,复制粘贴即可
- default_role_field_name = self.get_default_role_field_name()
- self.fields[default_role_field_name] = forms.CharField(required=False)
- self.fields[default_role_field_name].initial = 'member' #此处定义了一个member名字供步骤7中contribute获取数据
- field_name = self.get_member_field_name('member')
- self.fields[field_name] = forms.MultipleChoiceField(required=False)
- tenant_id = self.initial['tenant_id'] #此处获取url中的tenant_id
- isolated_scheduler_hosts = []
- try:
- #通过api从数据库获取当前租户所有可用的hosts(即图1-2的右边选择框)
- isolated_scheduler_hosts = api.nova.get_isolated_scheduler_list(request, tenant_id, type="host")
- except Exception:
- exceptions.handle(request, err_msg)
- enabled_host_names = [(host.isolated_name) for host in isolated_scheduler_hosts]
- hosts = []
- try: #此处获取所有可供选择的hosts,即图1-2中的左右之和
- hosts = api.nova.host_list(request)
- except Exception:
- exceptions.handle(request, err_msg)
- host_names = []
- for host in hosts:
- if host.host_name not in host_names and host.service == u'compute':
- host_names.append(host.host_name)
- host_names.sort()
- all_names = [(host_name, host_name) for host_name in host_names]
- #if sql table isolated_scheduler don't have any record, then all host is available
- if len(enabled_host_names) == 0:
- enabled_host_names = [(host_name) for host_name in host_names]
-
- self.fields[field_name].choices = all_names #此处将图1-2中左右之和复制给choices
- self.fields[field_name].initial = enabled_host_names #此处将图1-2中右边已选择框中的值赋值给initial
- #通过上述两个赋值操作,则框架自动会将数据渲染到页面
- class Meta:
- name = _("UpdateHostMembers") #标签页的名字定义
- slug = "UpdateHostMembers"
注意:上图中的all_names ,和enabled_host_names 数据结构举例如下:(其中initial 的初值只能有名字。)
- all_names = [(u'mynode158', u'mynode158'), (u'node10_31', u'node10_31'),(u'mynode1581', u'mynode1581'), (u'node10_311', u'node10_311'),(u'mynode1581', u'mynode1581'), (u'node10_311', u'node10_311')]
- enabled_host_names = [(u'mynode158'), (u'node10_31')]
-
- self.fields[field_name].choices = all_names
- self.fields[field_name].initial = enabled_host_names
其中initial 的初值只能有名字。all_names 数据结构为 [(u'mynode158', u'mynode158')] 而enabled_host_names 数据结构为 [(u'mynode158')],数据结构错误则渲染不出来
9、讲解UpdateIsolation代码(页面点击保存按钮则会执行handle函数进行业务逻辑处理,重点讲解handle函数):
- class UpdateIsolation(workflows.Workflow):
- slug = "update_isolation"
- name = _("Edit Isolation")
- finalize_button_name = _("Save")
- success_message = _('Modified isolation "%s".')
- failure_message = _('Unable to modify isolation "%s".')
- success_url = "horizon:admin:isolations:index"
- default_steps = (UpdateZoneMembers, UpdateAggregateMembers,UpdateHostMembers,)
- def format_status_message(self, message):
- return message % self.context.get('name', 'unknown isolation')
- def handle(self, request, data):
-
- tenant_id = data['tenant_id'] #获取tenant_id
- ################################################################################################
- #此处获取图1-2中右侧选择框中的数据。此处数据的初始化在步骤7中的contribute
- selected_host_names = self.context['enabled_host_names']
- enabled_host_names = []
- try:
- # 此处获取隔离调度数据库表中已有的hosts
- enabled_hosts = api.nova.get_isolated_scheduler_list(request, tenant_id, type="host")
- enabled_host_names = [(host.isolated_name) for host in enabled_hosts]
- except Exception:
- exceptions.handle(request, "get hosts exception")
- try:
- all_host_names = list(set(selected_host_names + enabled_host_names))
- #重点:此处将前端页面图1-2右侧选择的,与底层数据库实际存在的做操作,即得到本次操作减少的或者增加的hsots,从而获取进行处理
- host_add_list = list(set(all_host_names) - set(enabled_host_names))
- host_remove_list = list(set(all_host_names) - set(selected_host_names))
-
-
- tenant = api.keystone.tenant_get(request, tenant_id)
- tenant_name = tenant.name
- for host_name in host_add_list:#将上述得到新增host的列表,调用添加api添加到底层数据库持久化,此api更多跟进参考步骤10
- api.nova.isolatation_add_host(request, host_name, tenant_id, tenant_name)
- for host_name in host_remove_list:#将上述得到减少host的列表,调用添加api添加到底层数据库持久化
- api.nova.isolatation_remove_host(request, host_name, tenant_id, tenant_name)
- except Exception:
- exceptions.handle(request, "modify the hosts with tenant exception")
- #以下为处理aggregate与zones原理与host处理一致,不再重复讲解
- #################################################################################################
- selected_aggregate_names = self.context['enabled_aggregate_names']
- enabled_aggregate_names = []
- try:
- enabled_aggregates = api.nova.get_isolated_scheduler_list(request, tenant_id, type="aggregate")
- enabled_aggregate_names = [(aggregate.isolated_name) for aggregate in enabled_aggregates]
- except Exception:
- exceptions.handle(request, "get aggregates exception")
- try:
- all_aggregate_names = list(set(selected_aggregate_names + enabled_aggregate_names))
- aggregate_add_list = list(set(all_aggregate_names) - set(enabled_aggregate_names))
- aggregate_remove_list = list(set(all_aggregate_names) - set(selected_aggregate_names))
- tenant = api.keystone.tenant_get(request, tenant_id)
- tenant_name = tenant.name
- for aggregate_name in aggregate_add_list:
- api.nova.isolatation_add_aggregate(request, aggregate_name, tenant_id, tenant_name)
- for aggregate_name in aggregate_remove_list:
- api.nova.isolatation_remove_aggregate(request, aggregate_name, tenant_id, tenant_name)
- except Exception:
- exceptions.handle(request, "modify the aggregates with tenant exception")
- #################################################################################################
- selected_zone_names = self.context['enabled_zone_names']
- enabled_zone_names = []
- try:
- enabled_zones = api.nova.get_isolated_scheduler_list(request, tenant_id, type="zone")
- enabled_zone_names = [(zone.isolated_name) for zone in enabled_zones]
- except Exception:
- exceptions.handle(request, "get zones exception")
- try:
- all_zone_names = list(set(selected_zone_names + enabled_zone_names))
- zone_add_list = list(set(all_zone_names) - set(enabled_zone_names))
- zone_remove_list = list(set(all_zone_names) - set(selected_zone_names))
- tenant = api.keystone.tenant_get(request, tenant_id)
- tenant_name = tenant.name
- for zone_name in zone_add_list:
- api.nova.isolatation_add_zone(request, zone_name, tenant_id, tenant_name)
- for zone_name in zone_remove_list:
- api.nova.isolatation_remove_zone(request, zone_name, tenant_id, tenant_name)
- except Exception:
- exceptions.handle(request, "modify the zones with tenant exception")
- return True
10,继续跟进步骤9中天骄host到数据库的isolatation_add_host API:
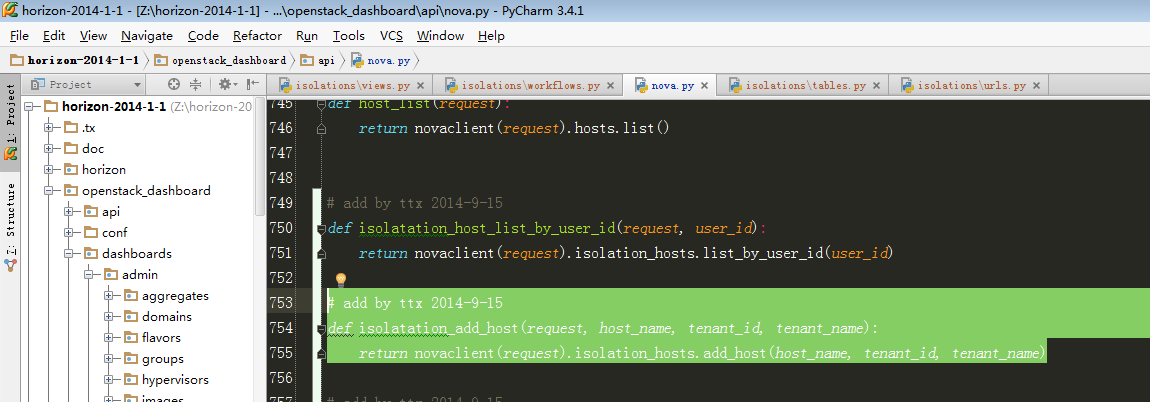
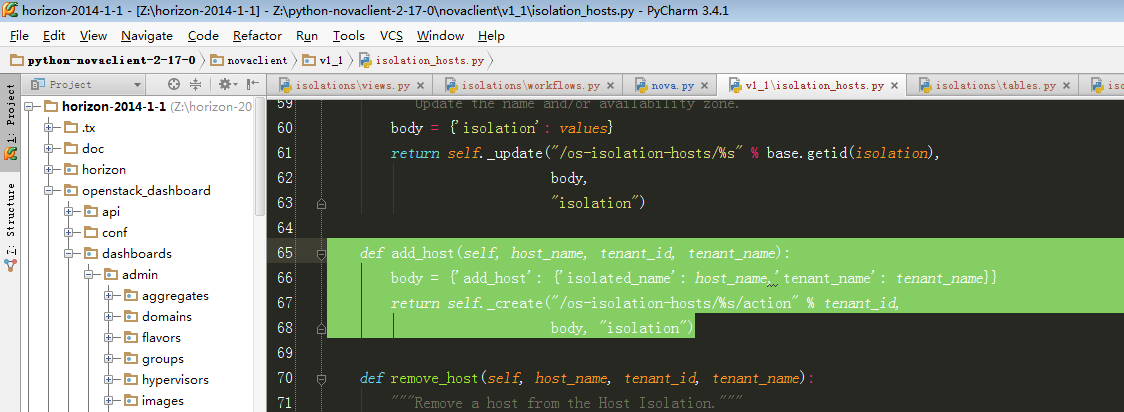
此处最后会拼装url到nova后端请求数据。
到此处从horizon到novaclient全部讲解完毕。
第二部分:wsgi发布及底层数据库操作:
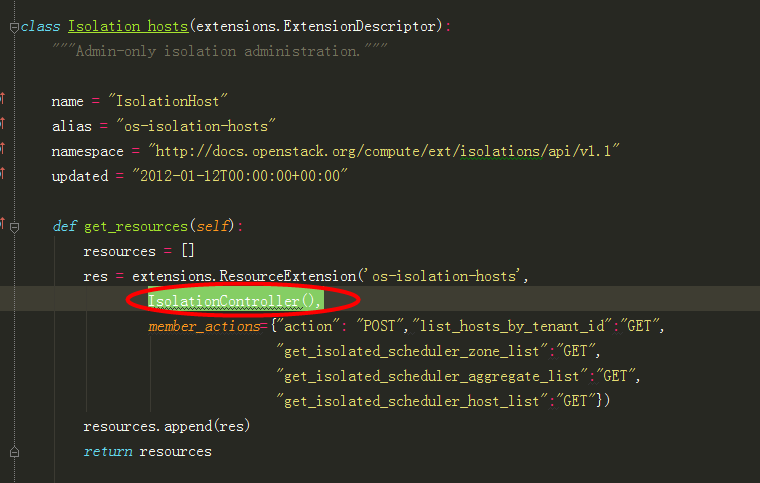
1、底层wsgi发布:
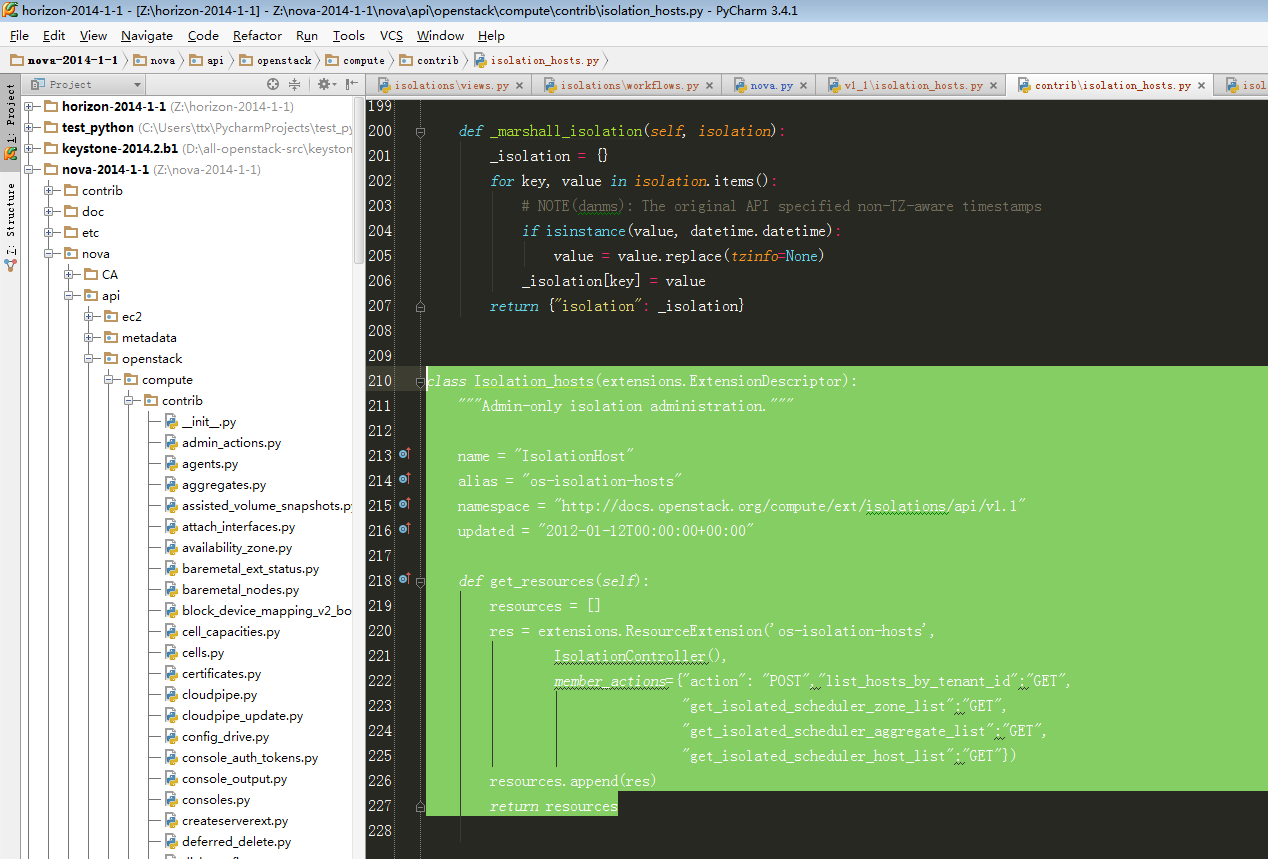
重点关注:
- member_actions={"action": "POST","list_hosts_by_tenant_id":"GET",
- "get_isolated_scheduler_zone_list":"GET",
- "get_isolated_scheduler_aggregate_list":"GET",
- "get_isolated_scheduler_host_list":"GET"})
这样就添加了各种自定义的api路由,前端curl就能够请求到此处底层nova api。
接下来以add_host为例讲解,其他api类似。
首先查看路由是否发布成功:
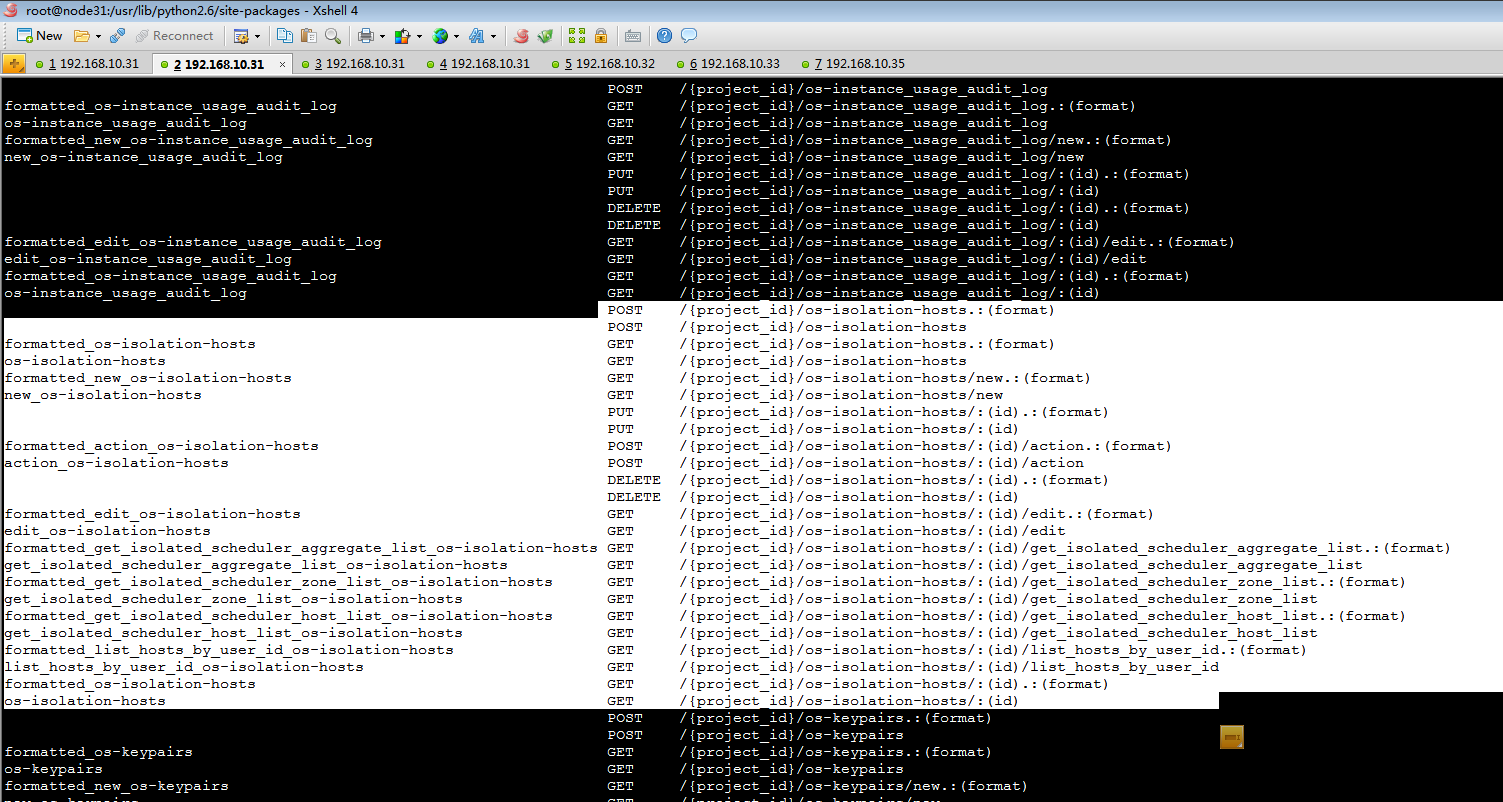
当前端发送如下URL请求时候:
- curl -i 'http://192.168.10.31:8774/v2/2a4fe5e733e44982b1d576c5a0fe4bfd/os-isolation-hosts/2a4fe5e733e44982b1d576c5a0fe4bfd/action' -X POST -H "User-Agent: python-novaclient" -H "Content-Type: application/json" -H "Accept: application/json" -H "X-Auth-Token: $TOKEN" -d '{"add_host": {"isolated_name": "node31","tenant_name":"admin"}}'
根据上述路由规则,对应到图1-1(此处图1-1指的是第二部分图1-1)中action : POST

2、根据wsgi发布定义的IsolationController(),找到IsolationController类中对应的action函数:
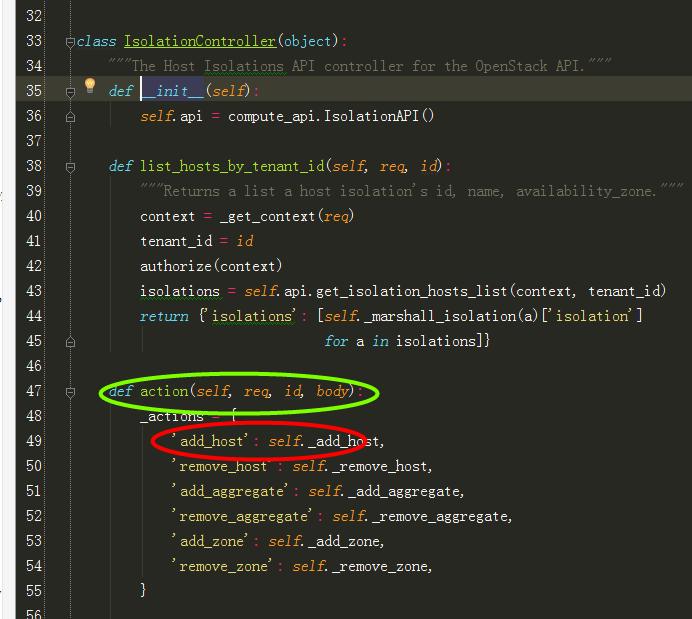
在根据url中的参数add_host,调用self._add_host,:

3、跟进到self._add_host:
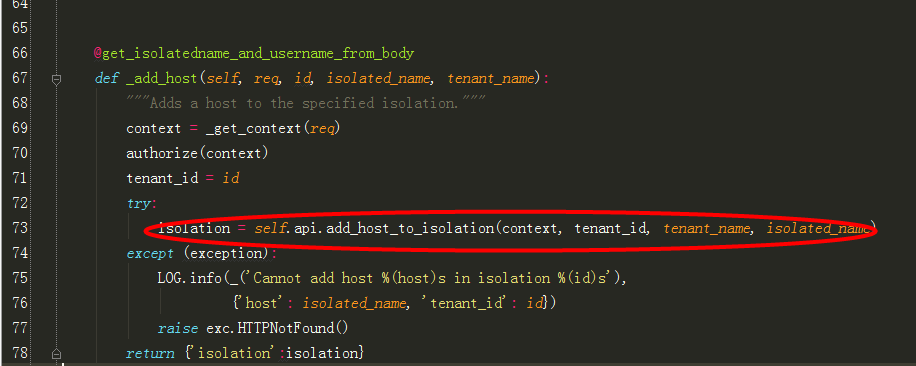
其中@get_isolatedname_and_username_from_body注解是一个装饰器,用来解析参数:
- def get_isolatedname_and_username_from_body(fn):
- """Makes sure that the host exists."""
- def wrapped(self, req, id, body, *args, **kwargs):
- if len(body) == 2 and "isolated_name" in body and "tenant_name" in body:
- isolated_name = body['isolated_name']
- tenant_name = body['tenant_name']
- else:
- raise exc.HTTPBadRequest()
- return fn(self, req, id, isolated_name, tenant_name , *args, **kwargs)
- return wrapped
4、跟进到add_host_to_isolation:

5、跟进到isolation_obj.IsolationList.add_host_to_isolation:

此处开始即调用db模块,和数据库进行交互了。
6、跟进到db.add_host_to_isolation:

7、继续跟进到IMPL.add_host_to_isolation:
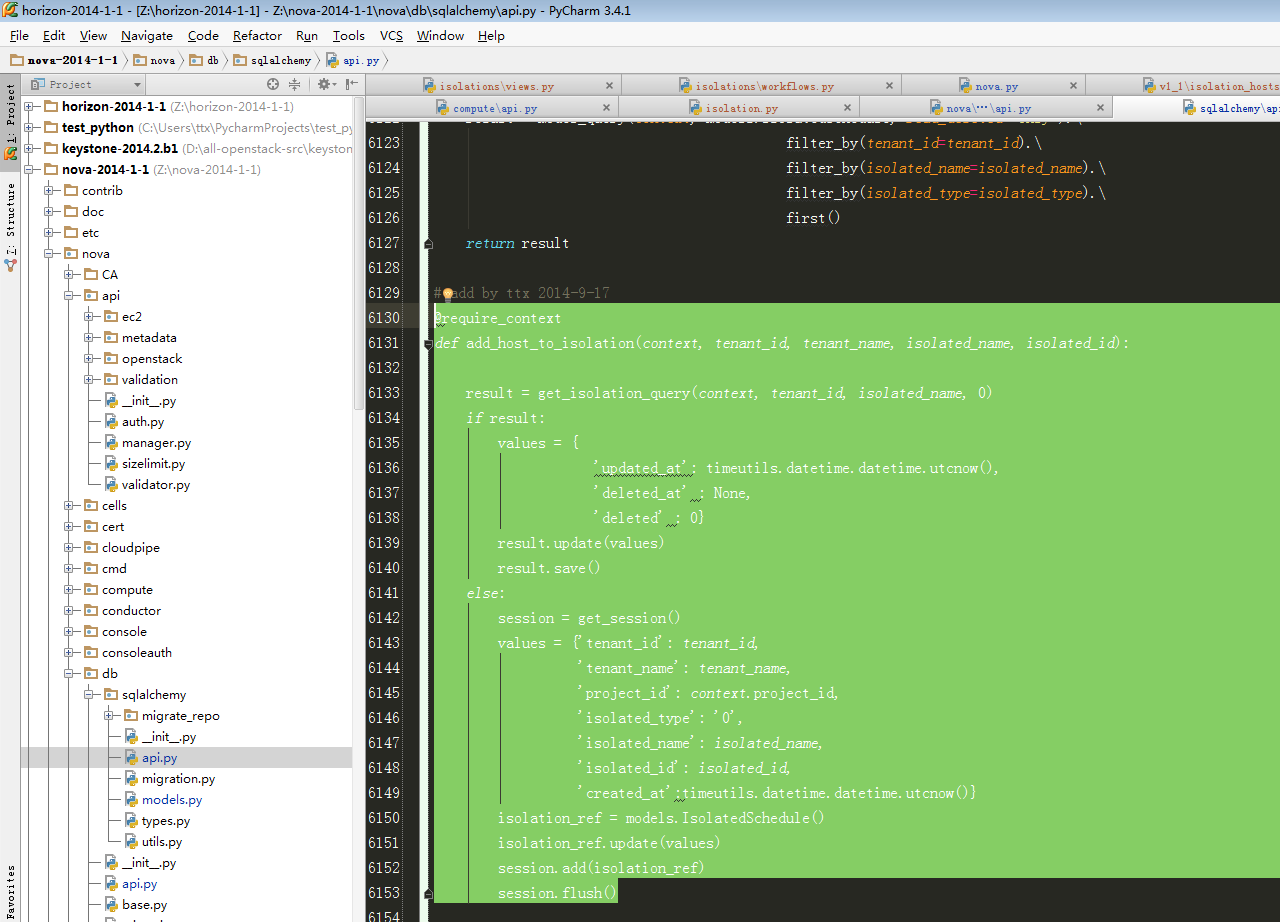
此处为最后操作数据代码,附上代码详解:
- # add by ttx 2014-9-17
- @require_context
- def add_host_to_isolation(context, tenant_id, tenant_name, isolated_name, isolated_id):
- #此处代码判断是否在数据库中已经存在该条数据,只是被soft_delete掉(即图7-1中所示),此处代码参考步骤8
- result = get_isolation_query(context, tenant_id, isolated_name, 0)
- if result: #如果已经存在被软删除过的数据,则将deleted更新为0即可
- values = {
- 'updated_at': timeutils.datetime.datetime.utcnow(),
- 'deleted_at' : None,
- 'deleted' : 0}
- result.update(values) #构造一个更新数据字典
- result.save() #更新数据
- else: #假若数据库没有任何记录,则直接新增
- session = get_session()
- values = {'tenant_id': tenant_id,
- 'tenant_name': tenant_name,
- 'project_id': context.project_id,
- 'isolated_type': '0',
- 'isolated_name': isolated_name,
- 'isolated_id': isolated_id,
- 'created_at':timeutils.datetime.datetime.utcnow()}
- isolation_ref = models.IsolatedSchedule()
- isolation_ref.update(values)
- session.add(isolation_ref)
- session.flush()#新增完之后需要执行flush才能立即写入到数据库
图7-1:(即node31的deleted不为0,表示被软删除过)

8、get_isolation_query函数讲解(此处其实就是在数据库进行一个where查询,返回符合where字句的第一条数据):
- #isolated_type 0==host 1==aggregate 2=zone
到此处从nova底层操作资源隔离数据库表API全部讲解完毕。
第三部分:自定义添加数据库表:
未完待续
第四部分:自定义资源隔离调度算法详解:
附上调度算法:
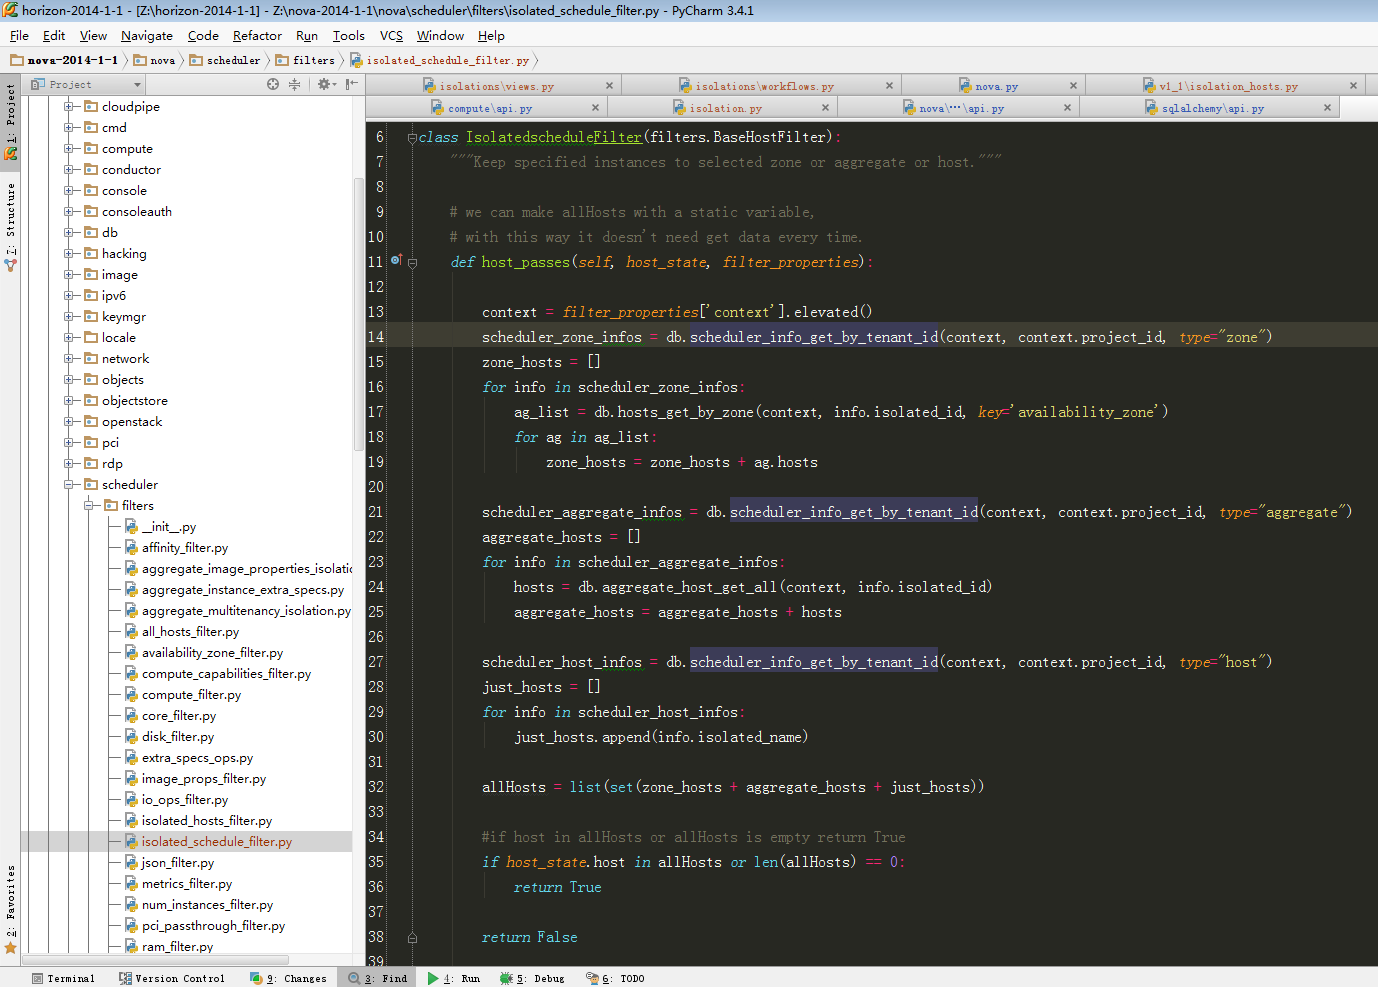
- # add by ttx 2014-9-9
- from oslo.config import cfg
- from nova import db
- from nova.scheduler import filters
- class IsolatedscheduleFilter(filters.BaseHostFilter):
- """Keep specified instances to selected zone or aggregate or host."""
- # we can make allHosts with a static variable,
- # with this way it doesn't need get data every time.
- #此函数将会在每次调度过滤判断自动调用,更多参考nova-scheduler详解 openstack-ice版
- def host_passes(self, host_state, filter_properties):
- context = filter_properties['context'].elevated()
- #从数据库获取当前租户所有可以使用的zones
- scheduler_zone_infos = db.scheduler_info_get_by_tenant_id(context, context.project_id, type="zone")
- zone_hosts = []
- #根据可用的zones迭代获取隶属于该zones下面所有的hosts
- for info in scheduler_zone_infos:
- ag_list = db.hosts_get_by_zone(context, info.isolated_id, key='availability_zone')
- for ag in ag_list:
- zone_hosts = zone_hosts + ag.hosts
- #从数据库获取当前租户所有可以使用的aggregates
- scheduler_aggregate_infos = db.scheduler_info_get_by_tenant_id(context, context.project_id, type="aggregate")
- aggregate_hosts = []
- #根据可用的aggregates迭代获取隶属于该aggregates下面所有的hosts
- for info in scheduler_aggregate_infos:
- hosts = db.aggregate_host_get_all(context, info.isolated_id)
- aggregate_hosts = aggregate_hosts + hosts
- #从数据库获取当前租户所有可以使用的hosts
- scheduler_host_infos = db.scheduler_info_get_by_tenant_id(context, context.project_id, type="host")
- just_hosts = []
- for info in scheduler_host_infos:
- just_hosts.append(info.isolated_name)
-
- #将所有可以的zones下面的hosts和aggregates下面的hosts以及可用的hosts合并,即为该租户所有可用的hosts
- allHosts = list(set(zone_hosts + aggregate_hosts + just_hosts))
- #if host in allHosts or allHosts is empty return True
- #如果当前host在上述allHosts ,则返回true,上层将会yield加入到可用hosts集合中
- #关于yield用法参考博文:Python yield语法 使用实战详解
- if host_state.host in allHosts or len(allHosts) == 0: #如果数据库没有任何信息,即初始状态则所有hosts都可用
- return True
- return False
- # this function not use now
- def get_enabled_hosts(self, hosts, filter_properties):
- pass
到此整个资源隔离调度算法从最上层页面操作到数据库最底层,以及数据库设计,调度算法过滤都讲解完毕。
|
 /2
/2 